

Can garage wall storage be easy?
Unfortunately, my garage kinda looks like the garbage pit from Star Wars Episode IV (you know – the scene where Luke, Han, and Leia almost get crushed to death but then C3PO finally answers the comlink and tells R2D2 to save them).
After making an easy wall-mounted garage storage cabinet you’ll be one step closer to getting a clean and neat garage space.
Sound like a good idea?
If you’re looking for a way to store paint, caulk, stain, and pretty much anything else that sits on your garage floor you should check out this project.
Plus, you’ll learn 7 important carpentry concepts that will come in handy when working on other parts of your house.
Garage Wall Storage Supply List
Here’s the supply list:
- 1/2 inch thick by 2 foot wide by 4-foot long birch plywood sheet ($16)
- 3/4 inch thick by 2 foot wide by 4-foot long birch plywood sheet ($21 x 2)
- 5mm Shelf Pins ($8) http://amzn.to/2qV8hZm
- Trim Router ($99) http://amzn.to/2rgqROy
- 1/2 inch Square Router Bit ($20) http://amzn.to/2qfSHWO
- Screw Eyes #8 by 1 5/8 inch Long ($4)
- 24 inch Long Bungee Cords ($10)
- Kreg Shelf Pin Jig ($35) http://amzn.to/2rgjfeK
- Drill (Free or Borrow)
- Circular Saw (Free or Borrow)
- 60 Tooth Circular Saw Blade ($16)
- Straight Edge (Free or $20)
- Clamps ($10)
- Brad Nailer and Compressor (I bet someone you know has one but it can be optional)
- Hammer and 6d Finish Nails (If you don’t use the Brad Nailer and Compressor)
- Safety Glasses ($5)
- Titebond II Wood Glue ($4)
- Winter Hat (Only if you’re working in your garage and it’s 20F, like me!!!!!)($5)
Yes, this list is extensive, to say the least. But if you have a great neighbor who resembles Ned Flanders then most of the tools could be free of charge.
Here’s some of what you’ll learn:
- Why you should consider a trim router to customize your house
- How to use a Kreg shelf pin jig so that cabinet making/modification is a breeze
- How to use a cleat to hang heavy cabinets on walls (kitchen cabinets use cleats all the time)
- What kind of screws to use for cinderblock or cement walls
You’ll have to read the rest to see #5, #6, and #7.
And in the end, you’ll see exactly why I love this easy garage wall storage cabinet.
Alrighty, let’s get started 🙂
Dados Make Garage Wall Storage Strong
If you want to store a ton of stuff on your garage wall then your cabinet has to be pretty darn strong.
That’s why the sides, top, and bottom of this cabinet are made from 3/4 in birch plywood and the back is 1/2 birch plywood.
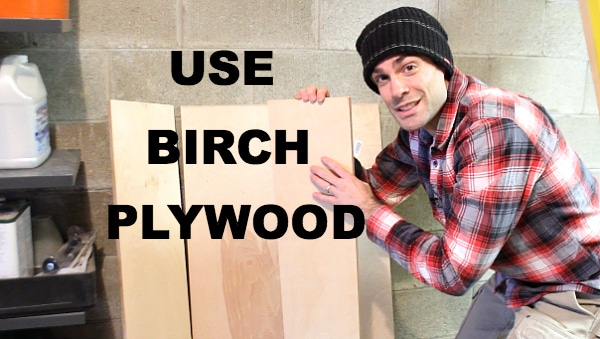
You can buy a 2 foot by 4-foot piece of 1/2 plywood right from most home stores. No cutting necessary – which I love.
And if you’re really nice to someone at the store they’ll cut your 3/4 inch plywood for you.
Seriously, all home stores have a huge saw in the building supplies section. And you can have an associate help you with all the cuts needed for this project if you don’t like saws.
I made the sides of the unit 8 inches wide so the shelves could accommodate two spray paint cans (one after the other, front to back).
Here’s a rundown of the dimensions:
- Back of unit = 1/2 inch thick by 2 foot wide by a 4-foot long birch plywood sheet
- Sides of unit = 3/4 inch thick by 8 inches wide by 4-foot long birch plywood
- Top & Bottom of unit = measure based on the dimensions you have once the back and sides are put together
Simple, right? It’s just a box.
The first step after cutting the left and right sides to size is to add a dado to them.
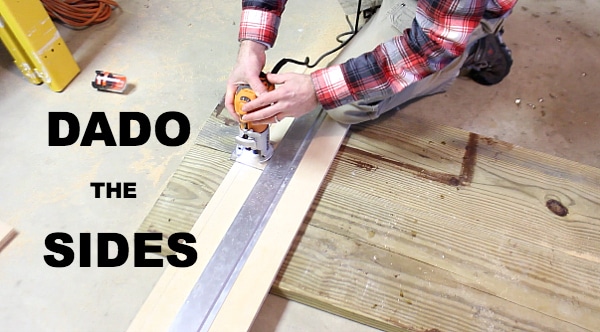
Dados are square grooves that add extra strength to carpentry projects. I’ll bet my hard-earned money that your kitchen cabinets have dados.
They’re easy to make if you have a router.
I’m here to tell you that if you’re interested in customizing your home and want to make it look unique you NEED a trim router.
This little tool helped me create sweet-looking porch column bases that would have cost a small fortune to contract out.
Your dado will allow you to position the 1/2 inch plywood into the sides of the garage wall storage unit like a puzzle piece.
Because the unit is so big you’ll want to hang it onto the wall using a cleat.
Cleats are just pieces of wood that help support cabinets. Again, they’re used sometimes in kitchen cabinet installations.
If you use a 3/4 inch thick scrap of plywood for your cleat you can hide it by adjusting the position of your dado on the sides of the unit.
Thus, place your dado 3/4 inch from the edge of both sides.
Add a 1/2 inch router bit to your trim router and adjust the depth of the bit to be 1/8 of an inch for the first pass.
Clamp a straight edge to your side piece so that the router bit will cut the dado 3/4 of an inch from the edge.
You should cut the 1/8 inch deep dado into each side then adjust the router bit depth down to 1/4 inch and repeat the process.
The final product will be a u-shaped dado 1/4 deep along the back edge of your side pieces.
You’ll get a few extra router tips in the video down below, so remember to watch it 🙂
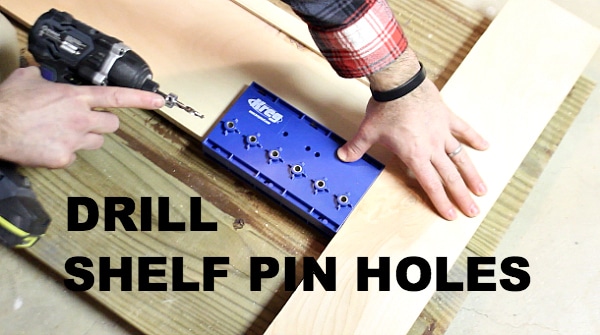
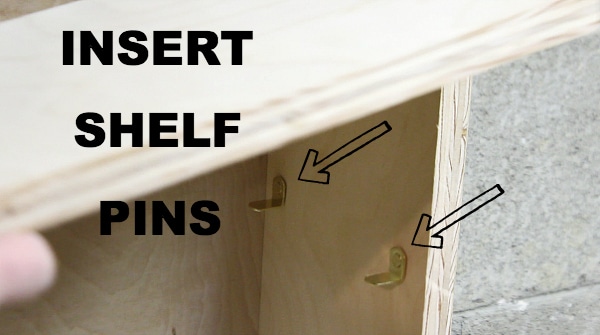
Now you’re going to get introduced to a crazy easy way to add shelves using a neat little tool by Kreg!
Kreg Shelf Pin Jigs Rock
You may not like Bret Michaels but you have to admit he’s a rockstar.
So is the Kreg Shelf Pin Jig.
Open any kitchen cabinet and you’ll see the shelves are held in place by 4 shelf pins.
The pins are adjustable and can be placed in the holes along the sides of the cabinet.
Those holes are what the Kreg Shelf Pin Jig will help you create.
You can place the jig along the edge of your wall unit and simply drill out the holes using the drill bit that comes with the kit.
If you’re super adventurous and want to build your own cabinets for the kitchen, bathroom, or family room the shelf pin jig will speed up that process.
I’ll use a Star Wars analogy, it’s like having a functional hyperdrive in the Millennium Falcon.
You’ll have to buy extra 5mm shelf pins because the kit only comes with 4. These cost around $4 for a pack of 8.
In my video, you’ll see that I spaced shelf pin holes 12 inches apart instead of just using the jig according to the directions.
BIG MISTAKE!!!
Just follow Kreg’s directions and you won’t have to make any adjustments like me. It wasn’t a big deal, as you’ll see, but added an extra wrinkle to the project.
Now for the fun part, using glue and nails 🙂
Assembling The Garage Wall Storage Unit
As a kid, I loved playing with lincoln logs.
But always wished I could make the little cabins stronger.
One way to accomplish this with your cabinet is to use Titebond II glue and brad nails (btw, lincoln logs actually have dados cut into them, cool!!)
The first step in the assembling process is to add Titebond II wood glue to the dado for the left side of the unit. Then place the 1/2 inch plywood into the dado.
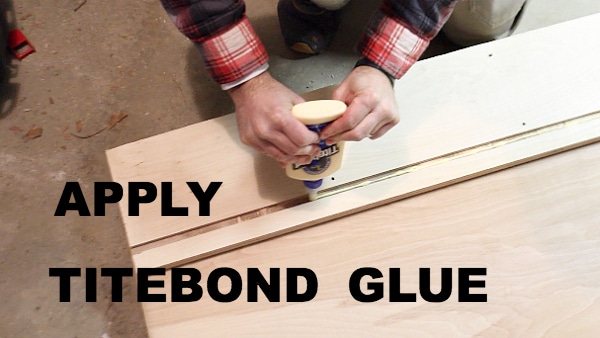
Do the same thing for the right side. Add glue. Position the 1/2 inch plywood.
Grab your rafter square.
Place it flush with the left side and back portion of the wall unit to ensure they are at a 90-degree angle to each other.
Then you can shoot brad nails into the side of the unit. Of course, you should be wearing eye protection.

To make this process easier you can draw a line along the outer portion of the left & right sides indicating the location of the 1/2 plywood. That way you can add brad nails every 8 inches in a matter of seconds.
Now you can cut two pieces of 3/4 inch plywood for the top and bottom. Measure the exact dimensions so that you can get a good fit. This entire process isn’t going to lead to a perfectly square box. So keep that in mind. But it’ll be pretty darn close.
It’s time to introduce you to the wonderful world of cleats. And not the kind you need on the football field.
Use a Cleat to Hang Heavy Stuff
Mr. T in his heyday (circa 1984) was like Hercules to me.
I loved him but unfortunately, he doesn’t help hang garage wall storage units that weight 30 lbs.
This is where a cleat comes in handy. Cleats are simply pieces of wood hung on a wall that support things.
As I mentioned earlier, the dado in your cabinet’s side pieces allow the wall unit to be hung on a 3/4 inch cleat.
You’ll have to secure the cleat to cinderblock with Tapcon screws.
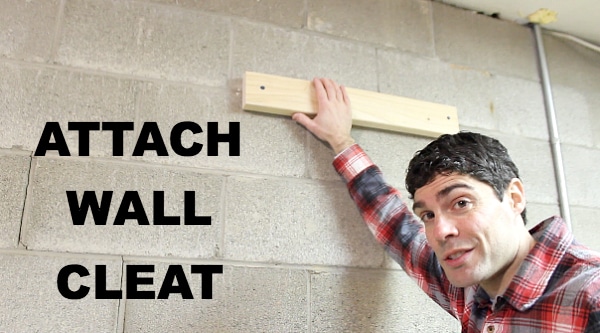
I don’t really go into how to do that in this tutorial but you’ll need a hammer drill and Tapcon drill bit that’s sized for the Tapcons you’ll be using.
If you have drywall in your garage you can attach the cleat to the studs using 3 inch deck screws.
Make sure to find the studs and not just hang the cleat on the drywall. This is unsafe because drywall isn’t strong enough to support the weight of the storage unit.
The cleat should be level. Otherwise, your cabinet won’t be level. So use a level when hanging the cleat 🙂
I actually added two cleats to the wall. One cleat was hung about 7 feet off the floor. This cleat is what the storage unit hangs onto.
The second cleat is at the bottom of the unit. It just allows you to secure the unit a bit more to the wall.
You can attach the garage storage unit to the cleats using 2-inch deck screws. I used 4 screws for each cleat.
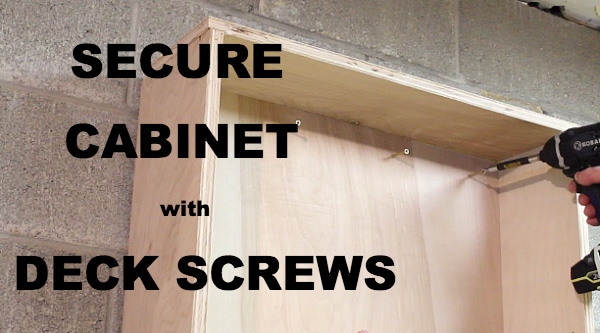
Step back after you’re done attaching your wall unit to the cleats.
May the Force be with you because this is a big accomplishment.
Yoda would be proud.
All you have left are the shelves and the bungee cords.
Super Space-Saving Garage Wall Storage
You’ll love the wall unit more than Ralphie loved his BB gun because it’ll help you store all the stuff in your garage that you trip over every day (maybe even BB pellets!!).
The final touch is to add the shelves. You’ll need to measure the width and length inside the wall unit. Use these dimensions to cut the shelves.
I’ve got two extra tips:
- Measure the dimensions where you’ll be placing the shelves
- Deduct the width of two shelf pins from the length of the shelves
Point #2 allows your shelves to slide onto the shelf pins instead of getting stuck on top of them. Even our kitchen cabinets (which weren’t cheap) have issues with the shelves not cooperating with the shelf pins.
You can use a circular saw to cut the shelves to size. Remember to use the 60 tooth blade for a super fine cut without splintering.
Add your shelf pins to the storage unit and place the shelves on top of them.
I chose to use screw eyes with bungee cords to keep the spray cans and other items from falling off the shelves. This is way easier to do than adding wood to the front of the unit and allows you to adjust the height of shelves down the road.
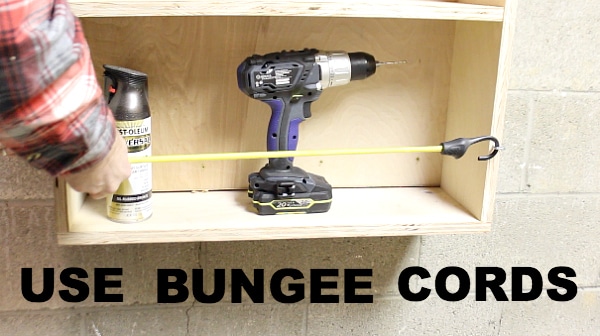
As an added bonus, you can see all the stuff on the unit and easily find what you need.
Even my wife said she likes this garage storage idea, so you know it must be good!!!!
Here’s a summary of the 7 carpentry concepts you learned from today’s project:
- Dados create strength (think Arnold) in cabinet building
- Nice people will cut your wood at home stores if you say please 😀
- Trim routers can help you customize your home
- Kreg shelf pin jigs ROCK (like Bret Michaels)
- Wood glue and nails/screws make carpentry projects solid cohesive units
- Cleats are fantastic for hanging heavy things (Mr. T isn’t going to help you)
- Bungee cords have a ton of uses (make Clark Griswold proud)
What’s Next
If you’re looking for more garage storage ideas check out these tutorials
One of the Greatest Garage Storage Ideas Ever (Overhead Storage Solutions)
Garage Wall Storage Using Lowe’s K-Rail System (Garage Organization Ideas)
If you’re doing a bathroom remodel and need help, join one of our online courses – they’ll make your bathroom renovation much easier!
Let me know if you have any questions and I’ll do my best to help.
Thanks as always for reading, watching, and being part of our awesome community.
Cheers,
Jeff
