
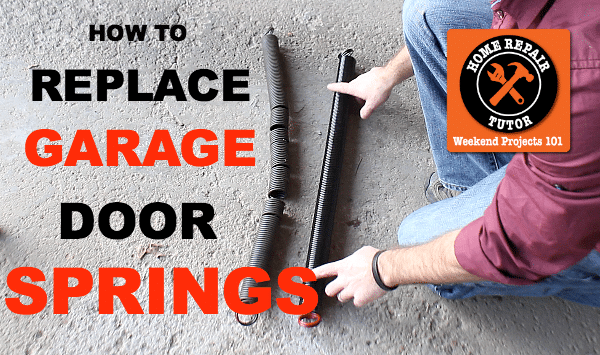
So, you think your garage door is safe.
I did too until an extension spring almost took my head off.
Our garage door opens and closes over 1000 times per year. That’s probably a lowball estimate since the kids just learned the garage door code.
There’s a lot of wear and tear on all the moving parts. And the springs take a beating.
A few years back I had an extension spring break as the garage door was closing.
That spring could have launched across the room like a rocket and lodged in my head. Fortunately, someone installed the safety cable correctly.
Today I’ll show you how to spot a bad extension spring and replace it without hurting yourself in the process.
Even if you don’t want to do this project you should know when your springs are unsafe.
Here’s the amazingly short supply list:
- Two C-Clamps
- Lineman’s Pliers
- Socket Wrench
- Crescent Wrench
- Duck Tape
- Step Stool
- 6 Foot Ladder
- New Garage Door Extension Springs
Let me show you what a bad spring looks like!
BUT, SAFETY FIRST…
Garage door extension springs are under extreme tension.
Thus, safety is a top priority.
Fortunately, it’s easy to keep yourself and all your garage stuff safe.
I almost forgot to mention this but make sure your car is not in the garage.
Park it on the street or in the driveway.
Next, open your garage door.
Place your step ladder directly underneath the door opening.
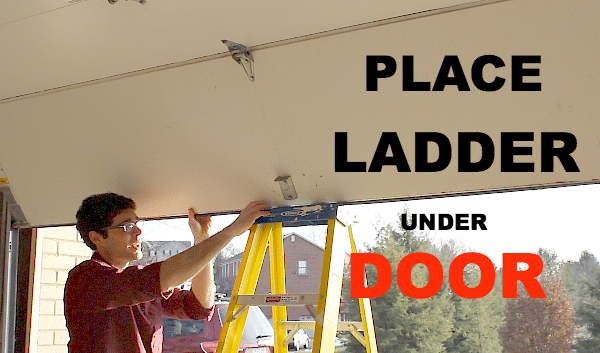
Check to make sure the bottom of the door can rest on top of the ladder.
Unplug the garage door opener.
The last thing you need is for someone to close the door while you’re working on it – that would be BAD NEWS!!
Pull down your garage door’s manual safety release. Now the door can move freely.
Double-check at this point that the bottom of the garage door will land on top of the ladder.
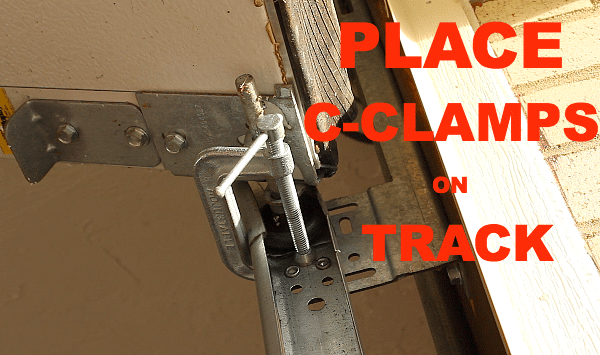
Place your C-clamps on both the left and right sides of the garage door tracks.
The C-clamps should rest underneath the last roller that’s on the track.
These are all the safety precautions. Better safe than sorry, right? (I really hate visiting the emergency room and bet you feel the same way)
SPOTTING AND REMOVING A BAD GARAGE DOOR EXTENSION SPRING
Spotting a bad garage door extension spring is easy.
If the coils are distended and irregular when the spring is extended then it needs to be replaced.
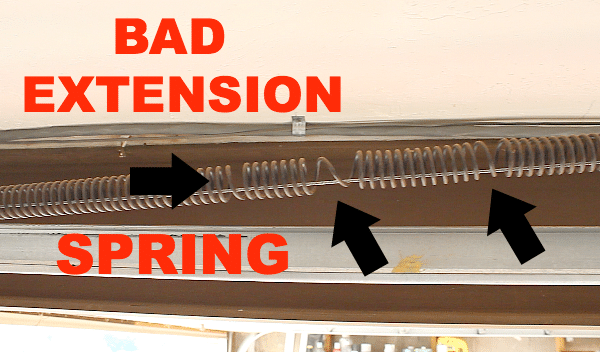
You can see this when your garage door is in the closed position.
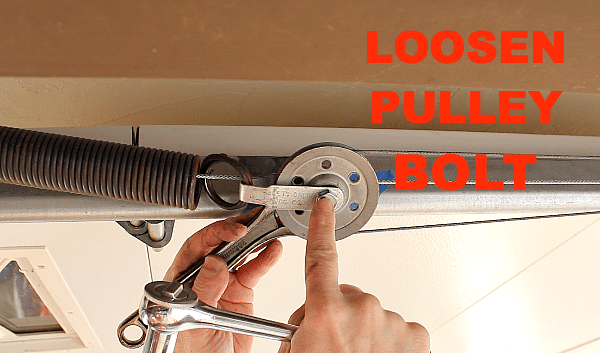
Extension springs are attached to a pulley and I-bolt.
The I-bolt is attached to a vertical bracket.
There should also be a steel safety cable that runs through the extension spring and is tied to the vertical bracket.
You’re going to need to remove the safety cable and the pulley in order to replace the old spring.
Using your wrenches, loosen the bolt that holds the pulley in place.
I’m a clumsy DIYer. There, I admitted it. I’m always making mistakes.
As such, I like having little tips that help me with the project.
Here’s one that might help you.
Tape the pulley wheel to the steel cable.
It might sound weird but the pulley wheel has a special relationship with the cable that it pulls.
Taping it to the cable will allow you to easily attach the pulley to the new extension spring.
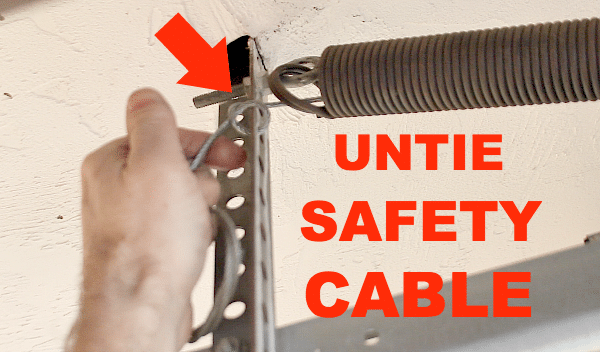
I also highly recommend taking a picture of the safety cable and how it’s tied to the vertical bracket.
That way you’ll know how to reattach the cable after you remove it.
Untie the safety cable from the bracket and pull it through the old extension spring.
Now you can remove the pulley clip from the end of the old spring and take the old extension spring down off the I-bolt.
HOW TO CHOOSE A NEW EXTENSION SPRING AND INSTALL IT
Garage door extension springs are color-coded.
This allows you to go to the hardware store and pick out the replacement springs in about 5 minutes.
As you can see in the picture below the last coil on my spring was painted red.
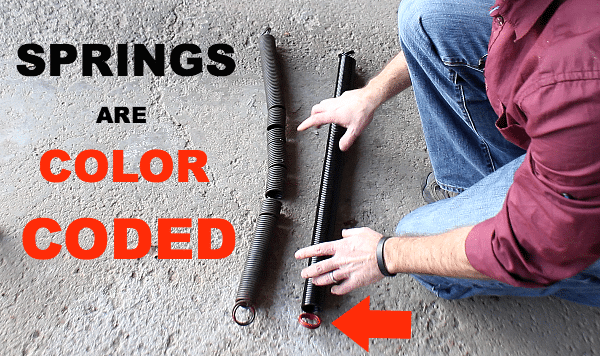
So I chose the new spring that had this color code.
As a side note, you should replace both springs at the same time because your garage door won’t close properly if one spring has more tension than the other.
At this point, you can place the safety cable clip onto the end of the new extension spring.
Thread the safety cable through the spring and tie it to the vertical bracket.
Reference the picture you took to see how to tie the cable.
Use your lineman’s pliers to make the cable as tight and secure as possible.
Place the pulley wheel into the safety cable clip and bolt it back together using your wrenches.
If you need slack in the steel cable that runs over the pulley remove the S-hook that holds the cable to the garage door bracket.
At this point, check to make sure the pulley cable isn’t intertwined with the safety cable.
For a good explanation, you should watch my video because I do a better job explaining it there (at around 7:20).
Here’s a super important safety tip: make sure to inspect all the steel cables.
I found out my pulley cable was in bad shape. And the last thing I need is for it to snap and hurt a family member.
Double-check that the steel pulley cable is nice and snug on the pulley wheel. It should have tension in it so that the cable won’t come loose while the door is being opened or closed.
If you need more tension you’ll have to adjust the position of the S-hook on the garage door support bracket. As a last resort, you can untie the steel cable from the 3-hole clip and tighten it with the lineman’s pliers.
Make sure loose steel cables are attached to brackets or wound together so that they don’t interfere with the operation of the door.
WRAPPING THINGS UP
Now all you have to do is remove the safety precautions.
Take the C-Clamps off the garage door track. Re-engage the garage door. Remove the ladder from underneath the door.
Plug the garage door opener in the outlet. Press the button on the wall and watch your door move down like a champ.
If you followed all the steps in the post and the video I bet you’ll have no problems.
But things happen. So, ask your own garage door questions down in the comments. I’d be happy to help out.
What’s Next
Do me one favor after you finish reading. Please, PLEASE, PLEASE check your extension springs to make sure they’re still in good shape. I would hate to see anything bad happen to you or your family.
It’s going to take 30 seconds. Put your garage door in the closed position and look at both springs to see if they are distended or irregular. And if they are, just follow my directions to replace them.
If you’re doing a bathroom remodel and need help, join one of our online courses – they’ll make your bathroom renovation much easier!
Let me know if you have any questions and I’ll do my best to help.
Thanks as always for reading, watching, and being part of our awesome community.
Cheers,
Jeff
