
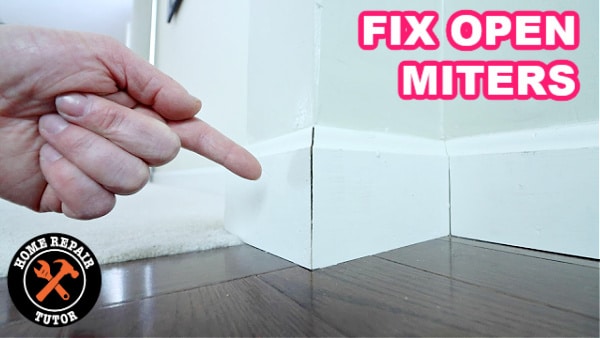
In today’s lesson, you’ll learn the best way to fix open miter joints and see what wood fillers are the best.
If you’re wondering, this project is super easy – anyone can do it.
And in the end, your baseboards will look like new.
Let’s dive in!
Open Miter Repair
There are two ways to repair miter joints:
- Remove the woodwork and redo the miter
- Repair the miter with a wood filler
Some homeowners have the tools to remove baseboard trim and redo the miter.
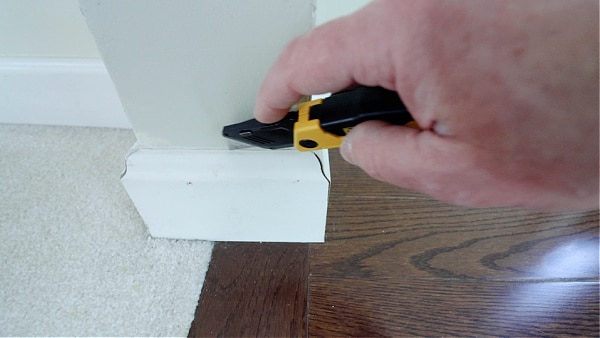
The first step for that route is to check for caulking between the woodwork and drywall.
Use a utility knife to score any caulking as this prevents drywall damage when the woodwork is pulled from the wall.
The other option is to use wood fillers to repair open miters. And we’ll discuss two good options.
How to Use DryDex to Repair Open Miters
DryDex is a great product for filling nail holes, cracks, and miters. This isn’t a DryDex commercial, it’s really a great product and has tons of good reviews on Amazon.
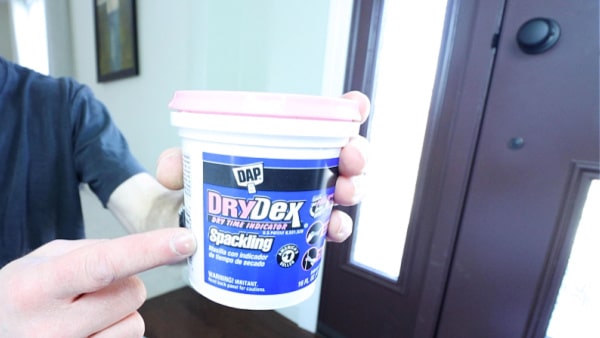
The open miter in this example was about 1/16″ wide. So DryDex was a good option.
I recommend taping off hardwood floors or protecting the carpet with cardboard. This prevents the DryDex from getting onto those surfaces.
Apply DryDex to the woodwork with a 2-inch or 3-inch putty knife. Then tool the open miter joint to fill it.
Wipe away excess DryDex and allow it to turn from pink to white. At that point, the woodwork can be sanded smooth with a damp sponge.
Primer and paint can be applied over the woodwork to make the woodwork look like new.
Is DryDex the best way to fix open miters?
There is another way and it’s arguably better.
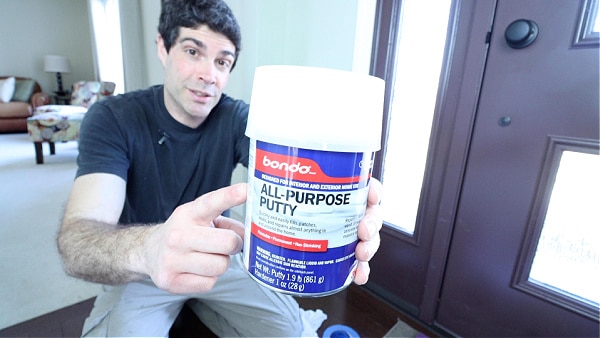
How to Use Bondo to Repair Open Miters
Homes get a lot of foot traffic. Kids and pets frequently bump into the woodwork and cause damage.
If there’s an open miter in a high traffic area, it’s best to use Bondo All-Purpose Putty.
There’s one drawback to Bondo: it stinks!
Open windows and make sure the house has good ventilation.
Also, protect any carpets with pieces of cardboard or cereal box tops – this is a cheap way to ensure your floors remain in good shape.
Furthermore, wear gloves before working with the Bondo.
Woodwork has to be sanded down with 80-grit and 180-grit sanding sponges or paper. This should reveal the bare wood.
Bondo has a cream hardener and putty component. It’s important to read the directions and spread a 3-inch by 1/2″ thick circle of Bondo putty on a non-porous surface, like a tile.
Then apply a 3-inch bead of the cream hardener into the putty. Mix both the cream hardener and putty for 2 minutes.
Once the Bondo is mixed it can be applied into the open miter using Bondo spreaders. Quickly work the Bondo into the miter and remove any excess before it hardens.
Frankly, Bondo is awesome!
It’ll make your repairs rock solid and I’m arguing that it might be the best way to fix open miters, period – but you be the judge.
This short tutorial shows how to use DryDex and Bondo to fix open miter joints and is well worth the 9 minutes
What’s Next
Hopefully these tips help you with your carpentry project. Here’s an Amazon link for DryDex and one for Bondo in case you’re interested.
If you need help with other projects around the house we have a ton of great tutorials.
Here’s one on how to maintain your garage doors and here’s another that shows how to repair copper pipe leaks with SharkBites.
Let me know if you have any questions and I’ll do my best to help.
Hope you have an awesome day!
Cheers,
Jeff
