

Delta shower valve installation doesn’t have to be hard.
That said, if local plumbing code requires copper, this tutorial will be a huge help.
There are tons of tips that’ll make your project much easier, so let’s dive in!
Delta Shower Valve Installation Supplies
Here are the supplies I recommend:
- Delta MultiChoice Rough-In Valve
- Bernzomatic MAP Gas
- TS400 Trigger Start Torch
- H-20 Water Soluble Flux
- Acid Brush for Flux
- Oatey Safe-Flo Solder
- Emery Cloth
- Nylon Grit Pads
- Ridgid Deburring Tool
- Sioux Chief AA MiniResters (Water Hammer Arrester)
- Type L 1/2″ Copper
- Flame Protector Pads
Don’t worry, I’ll show you how to use all these materials.
How to Set Delta Shower Valves to Right Depth
Setting any shower valve to the correct depth is important.
Otherwise, the finished tile and shower trim won’t work together.
Attach a scrap piece of the backer board to the stud walls.
Then dry fit the tile being used and place the valve inside the wall (flush with the adjacent wall).
Get the measurement from the end of the plaster guard to the finished wall.
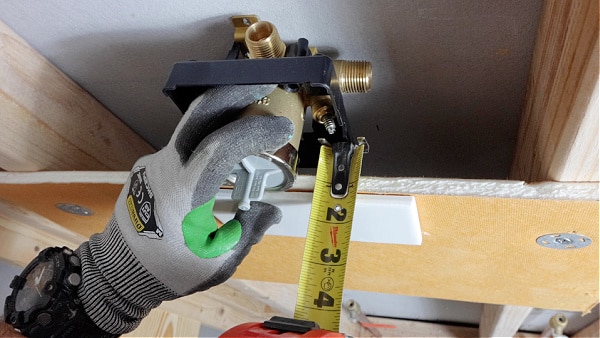
This measurement is the depth of the wood blocking that’s needed to set the valve at the right depth. T
his has to be spot on, especially for copper – although, there’s more wiggle room for PEX if the depth has to be changed prior to tile.
Delta valves typically just need a piece of 2×4 or 2×10 dimensional lumber, which can be nailed or screwed to studs.
In addition, it’s equally important to consider the ideal shower valve height – this is particularly important for short or tall folks.
Connect Copper Riser Pipe to Delta Valve
The first step to installing a Delta shower valve is to connect the riser pipe.
Deburr and prep the copper pipe with emery cloth or nylon grit pads.
Then apply the Oatey H-20 flux to both the pipe and drop-ear elbow; this is a great option because it’s water-soluble.
In addition, the water lines won’t need to be flushed when using H-20 flux.
I like to overhang the pipe on two pieces of 2×6 and solder it with a torch.
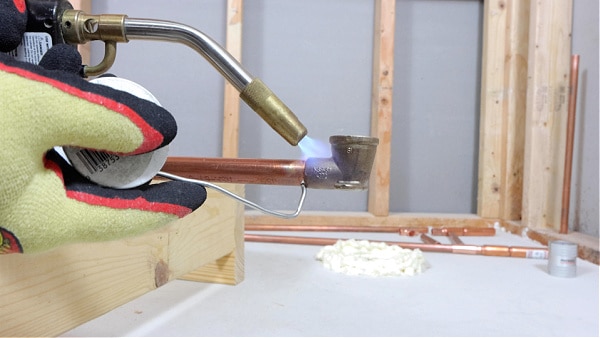
This keeps the workspace safe and provides ample working room for the torch.
Let that cool and wipe off any excess flux.
How to Prep Copper Pipes for Delta Shower Valve
Copper pipe prep is the key to getting great soldered joints.
The first step is to deburr both the inside and outside of the pipe.
Then use either emery cloth or nylon grit pads to clean the copper.
Fittings are normally very clean but it doesn’t hurt to use a wire brush.
Finally, apply a thin layer of the Oatey H-20 flux to the pipe and fitting.
Once the fitting is placed on the pipe, wipe off any excess flux.
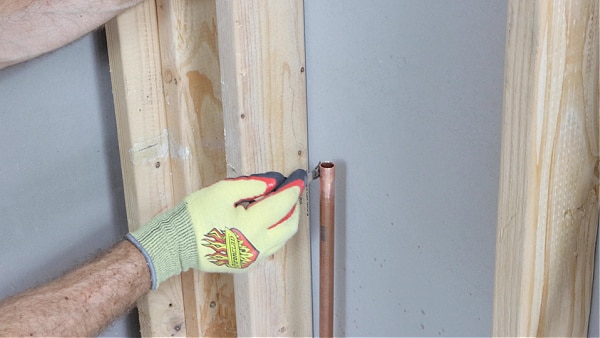
This last tip will help you get awesome-looking soldered joints.
How to Solder Copper Pipes to Delta Shower Valves
It’s good practice to start the heat at the bottom and work upward.
Therefore, I recommend heating the couplings first and then working up toward the valve.
Also, pre-heat the first half-inch of the copper pipe (just for a few seconds) and then apply heat to the fitting.
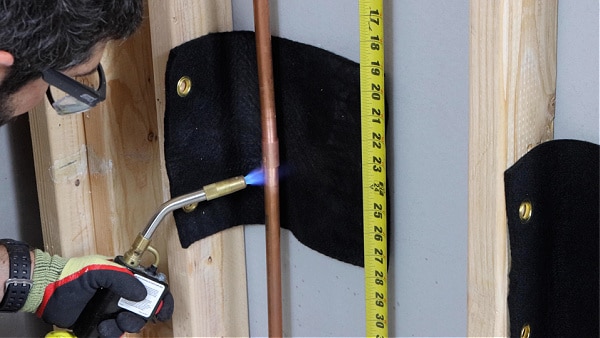
Dab the solder on the fitting/pipe connection and once it starts to melt, remove the heat.
This admittedly takes some practice, so it never hurts to do just that – practice with spare pieces of copper and fittings.
Watch this complete tutorial to see all the steps for a Delta shower valve installation with copper pipe
What’s Next
Hopefully, the tips in this tutorial help you with your shower remodel.
If your next step is to waterproof the shower, this Schluter tutorial will help out.
Do you need help with your bathroom remodel?
Make your project easier with our Platinum Membership, over 375 step-by-step tutorials and Personal Coaching.
Tap the button below to learn more
Cheers,
Jeff
