
You want your house to look awesome, right?
A good place to begin is with your lighting because it sets the tone for your room.
Think about it, nobody will say your kitchen looks great if the lights are from 1987 (trust me on this one since we had a pool table light over our island, LOL).
It’s no surprise that replacing dated ceiling lights presents challenges though.
Like getting shocked or starting and being confused by all the wires!!
Yes, this has happened to me several times and fortunately, I lived through each incident!!
You might need just a few tips to feel more comfortable with this kind of project.
So today I’ll share some techniques that’ll give you more confidence.
It’s simpler than you probably imagined.
Modern Ceiling Light Supply List
Here’s your supply list
- Phillips and Flat Head Screwdrivers ($9)
- Fiberglass Ladder ($95…but shop around)
- Painter’s Tape ($11)
- Combination Strippers ($9)
- Voltage Detector ($19 to $21)
- 60 Watt LED Light Bulbs ($19 to $25 for 6-Pack)
- Safety Glasses
- Camera or Smartphone (Free)
The Golden Rule to Electricity: DON’T TOUCH IT
Yep, that’s a good rule to live by.
Every electrical project starts with turning the power off at the electrical panel or fuse box.
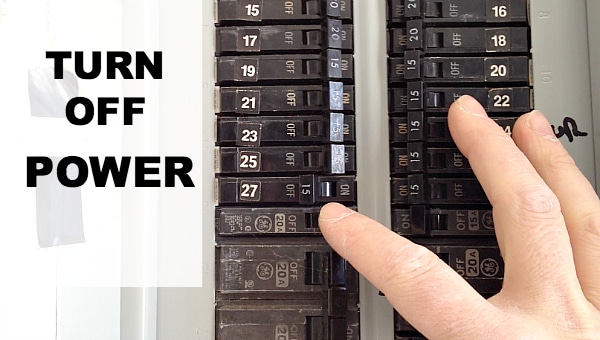
This will save your life.
Figure out what circuit your ceiling light is on and make sure the power is off.
After doing this, turn the light switch on and off to double-check the light is electricity-free.
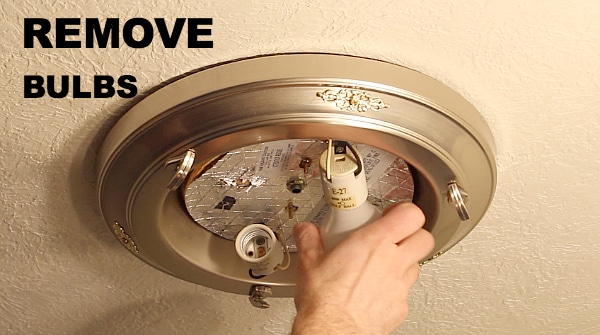
Carefully take your old ceiling light’s shade off. You’ll need to do this to access the screws that hold it to the junction box.

And since light bulbs break easier than eggs you’ll want to remove them, too!
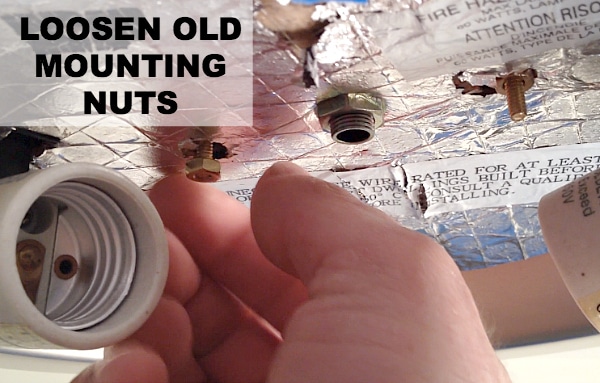
Loosen the screws or nuts that hold the light on the junction box.
Here’s super helpful tip if you’re working by yourself: attach blue painter’s tape to your fixture.

As you can see, I have 3 pieces of blue painter’s tape (about 12 inches in length) attached to the fixture and ceiling.
The tape is great for supporting the light as you lower it from the junction box. This will allow you to reach the wiring without having to hold the light with one hand.
Yeah, I work by myself a lot and brainstormed this idea. Let me know if you have a better suggestion I should try next time 🙂
Since I really (and I MEAN REALLY) don’t like getting shocked I highly recommend using a voltage detector to check the wiring in the junction box.
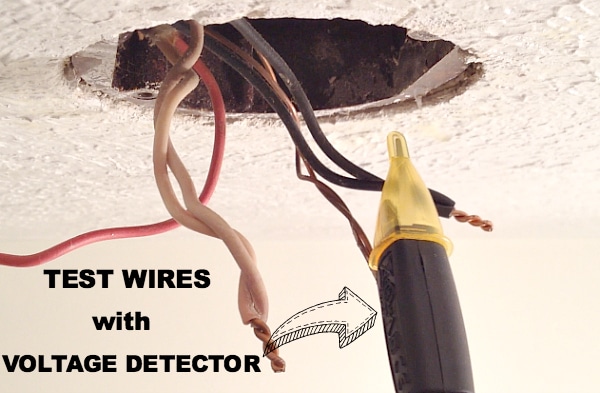
Turn on the voltage detector and touch all the wires. If there’s electricity present the voltage detector will beep, and yes it’s a rather annoying sound.
Before disassembling the wiring it’s a genius move to take a picture.

Side note: if you’re a techie you’ll notice I’m actually shooting a video in the picture. Rather than a picture-in-picture I’ve set a precedent and created a video-in-picture, haha.
The next step is to start the installation of the new light. You’ll see that it’s not hard at all.
Wiring the New Ceiling Light
I wonder if Einstein did his own electrical work?
Just a thought.
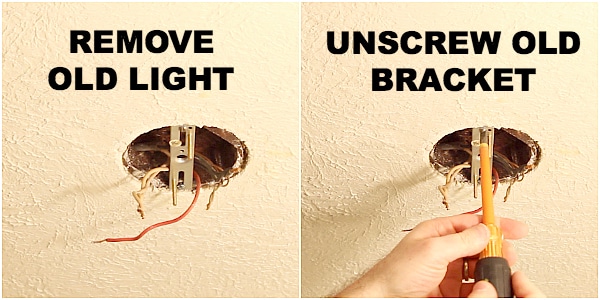
Anyhow, unwire the old light by twisting the wire nuts counterclockwise. Then remove the old bracket from the junction box. It’s held in place with two screws (turn these counterclockwise as well).
Add the new mounting bracket to the junction box using the 2 outlet screws that came with your new light. You can also add the long mounting screws to the new bracket before securing it to the junction box. Tighten the mounting screws 2-3 revolutions.

Just make sure the green grounding screw faces you instead of the other way.
At this point check the junction box wires for damage. The wire below is in good shape.
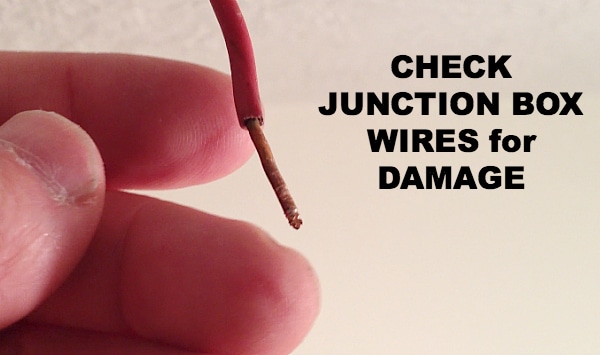
If your wires are nicked or kinked in any way you should cut off the damaged portion. Then you can strip off 3/4 of an inch of insulation to reveal a new piece of wire.
The light I’m working on is on a three-way switch. Here’s the wire makeup in the junction box
- Two bare copper wires (ground wires)
- Two white wires (neutral wires)
- Two black wires (hot wires)
- One red wire (hot wire)
You might have a similar setup. Maybe you don’t.
Make sure to follow the directions that come with your new light.
Chances are very good that you’ll only have to make 3 wire connections.
The light in this example has
- One bare copper wire (ground wire)
- Two white wires (neutral wires) and
- Two black wires (hot wires)
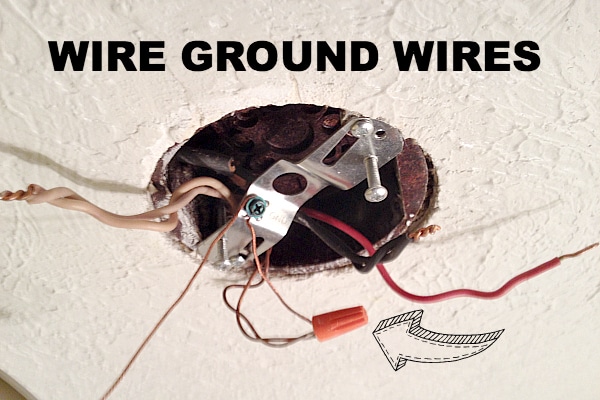
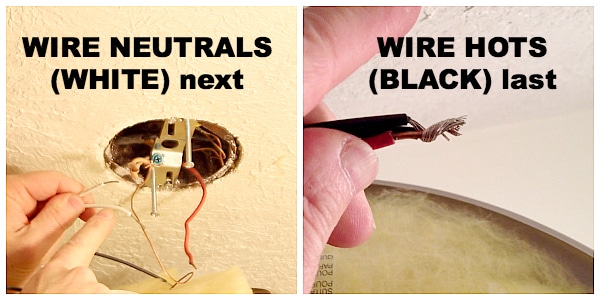
Your first step should be to wrap the light’s ground wire around the green ground screw one clockwise revolution and then connect it with the ground wires coming from the junction box. Use a wire nut that can accommodate 3 wires.
Then twist together the two white neutral wires from the light and wrap them around the white neutral wires from the junction box. In this case, I needed a wire nut that could accommodate 4 wires. And unfortunately, sometimes the new light doesn’t come with this size of the wire nut. Thus, it’s a fantastic idea to buy a pack of wire nuts of this size while at the store.
As I said above, my wiring setup could be different than the one you’re dealing with.
So it makes sense for you to follow the directions that come with your new light. In my case, I wired the black hot wires from the light to the solo red wire coming from the junction box. Then I capped the black wires in the junction box.
Here’s the video that shows the complete step-by-step instructions. I tried to show as many tips as possible so that you’ll be confident in your own installation 🙂
Attaching the Fixture to the Ceiling
Slide the light fixture up onto the mounting screws. The screws will pass through the keyholes.
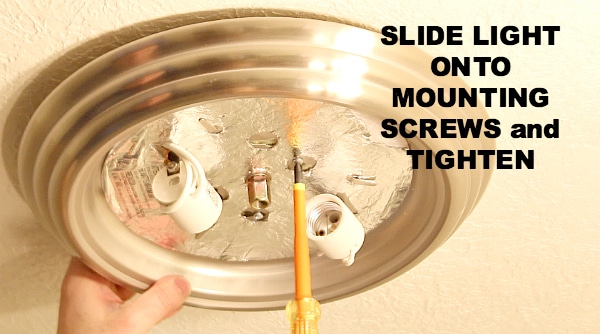
Frankly, this is sometimes the most frustrating part of installing a ceiling light. Hang in there because you might need additional patience in order to find the darn mounting screws.
Twist the light so that the screws slide into the small section of the keyhole. Once this is the case you can tighten the screws with a screwdriver.
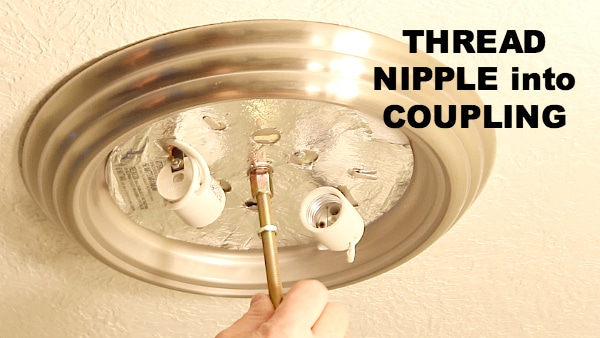
Thread the long nipple into the ceiling light’s coupling. This will hold the shade. Just make sure to lock the nipple in place using the locking nut.
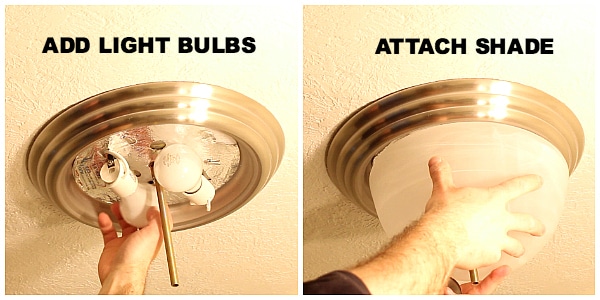
Add your light bulbs, I used two 60 watt incandescent bulbs since I had them and that’s what the directions called for. Lately I’ve been trying to switch over to LEDs because they last forever and save a TON of electricity.
Carefully place your shade onto the light and secure it to the nipple. Don’t feel like you need to make the shade super tight. Mine is made of glass and it could totally break if too much tension is placed on it from the decorative mounting nut.
Turn your electricity back on at the circuit breaker and see if the circuit trips or acts normal.
Hopefully, the circuit flips on with no problems. I actually had a tripping incident due to the mounting screw touching one of the wires in the junction box.
OOOOPS!!!
Be smarter than me and make sure that none of your wires in the junction box touch the mounting screws. This never happened to me before but it’s a great learning lesson.
What’s Next
Our tutorial showing how to fix your fluorescent light ballast is also great – and could save a call to the electrician!
If you’re doing a bathroom remodel and need help, join one of our online courses – they’ll make your bathroom renovation much easier!
Let me know if you have any questions and I’ll do my best to help.
Thanks as always for reading, watching, and being part of our awesome community.
Cheers,
Jeff
